Leaf Provider Connection / Authentication Link
Overview
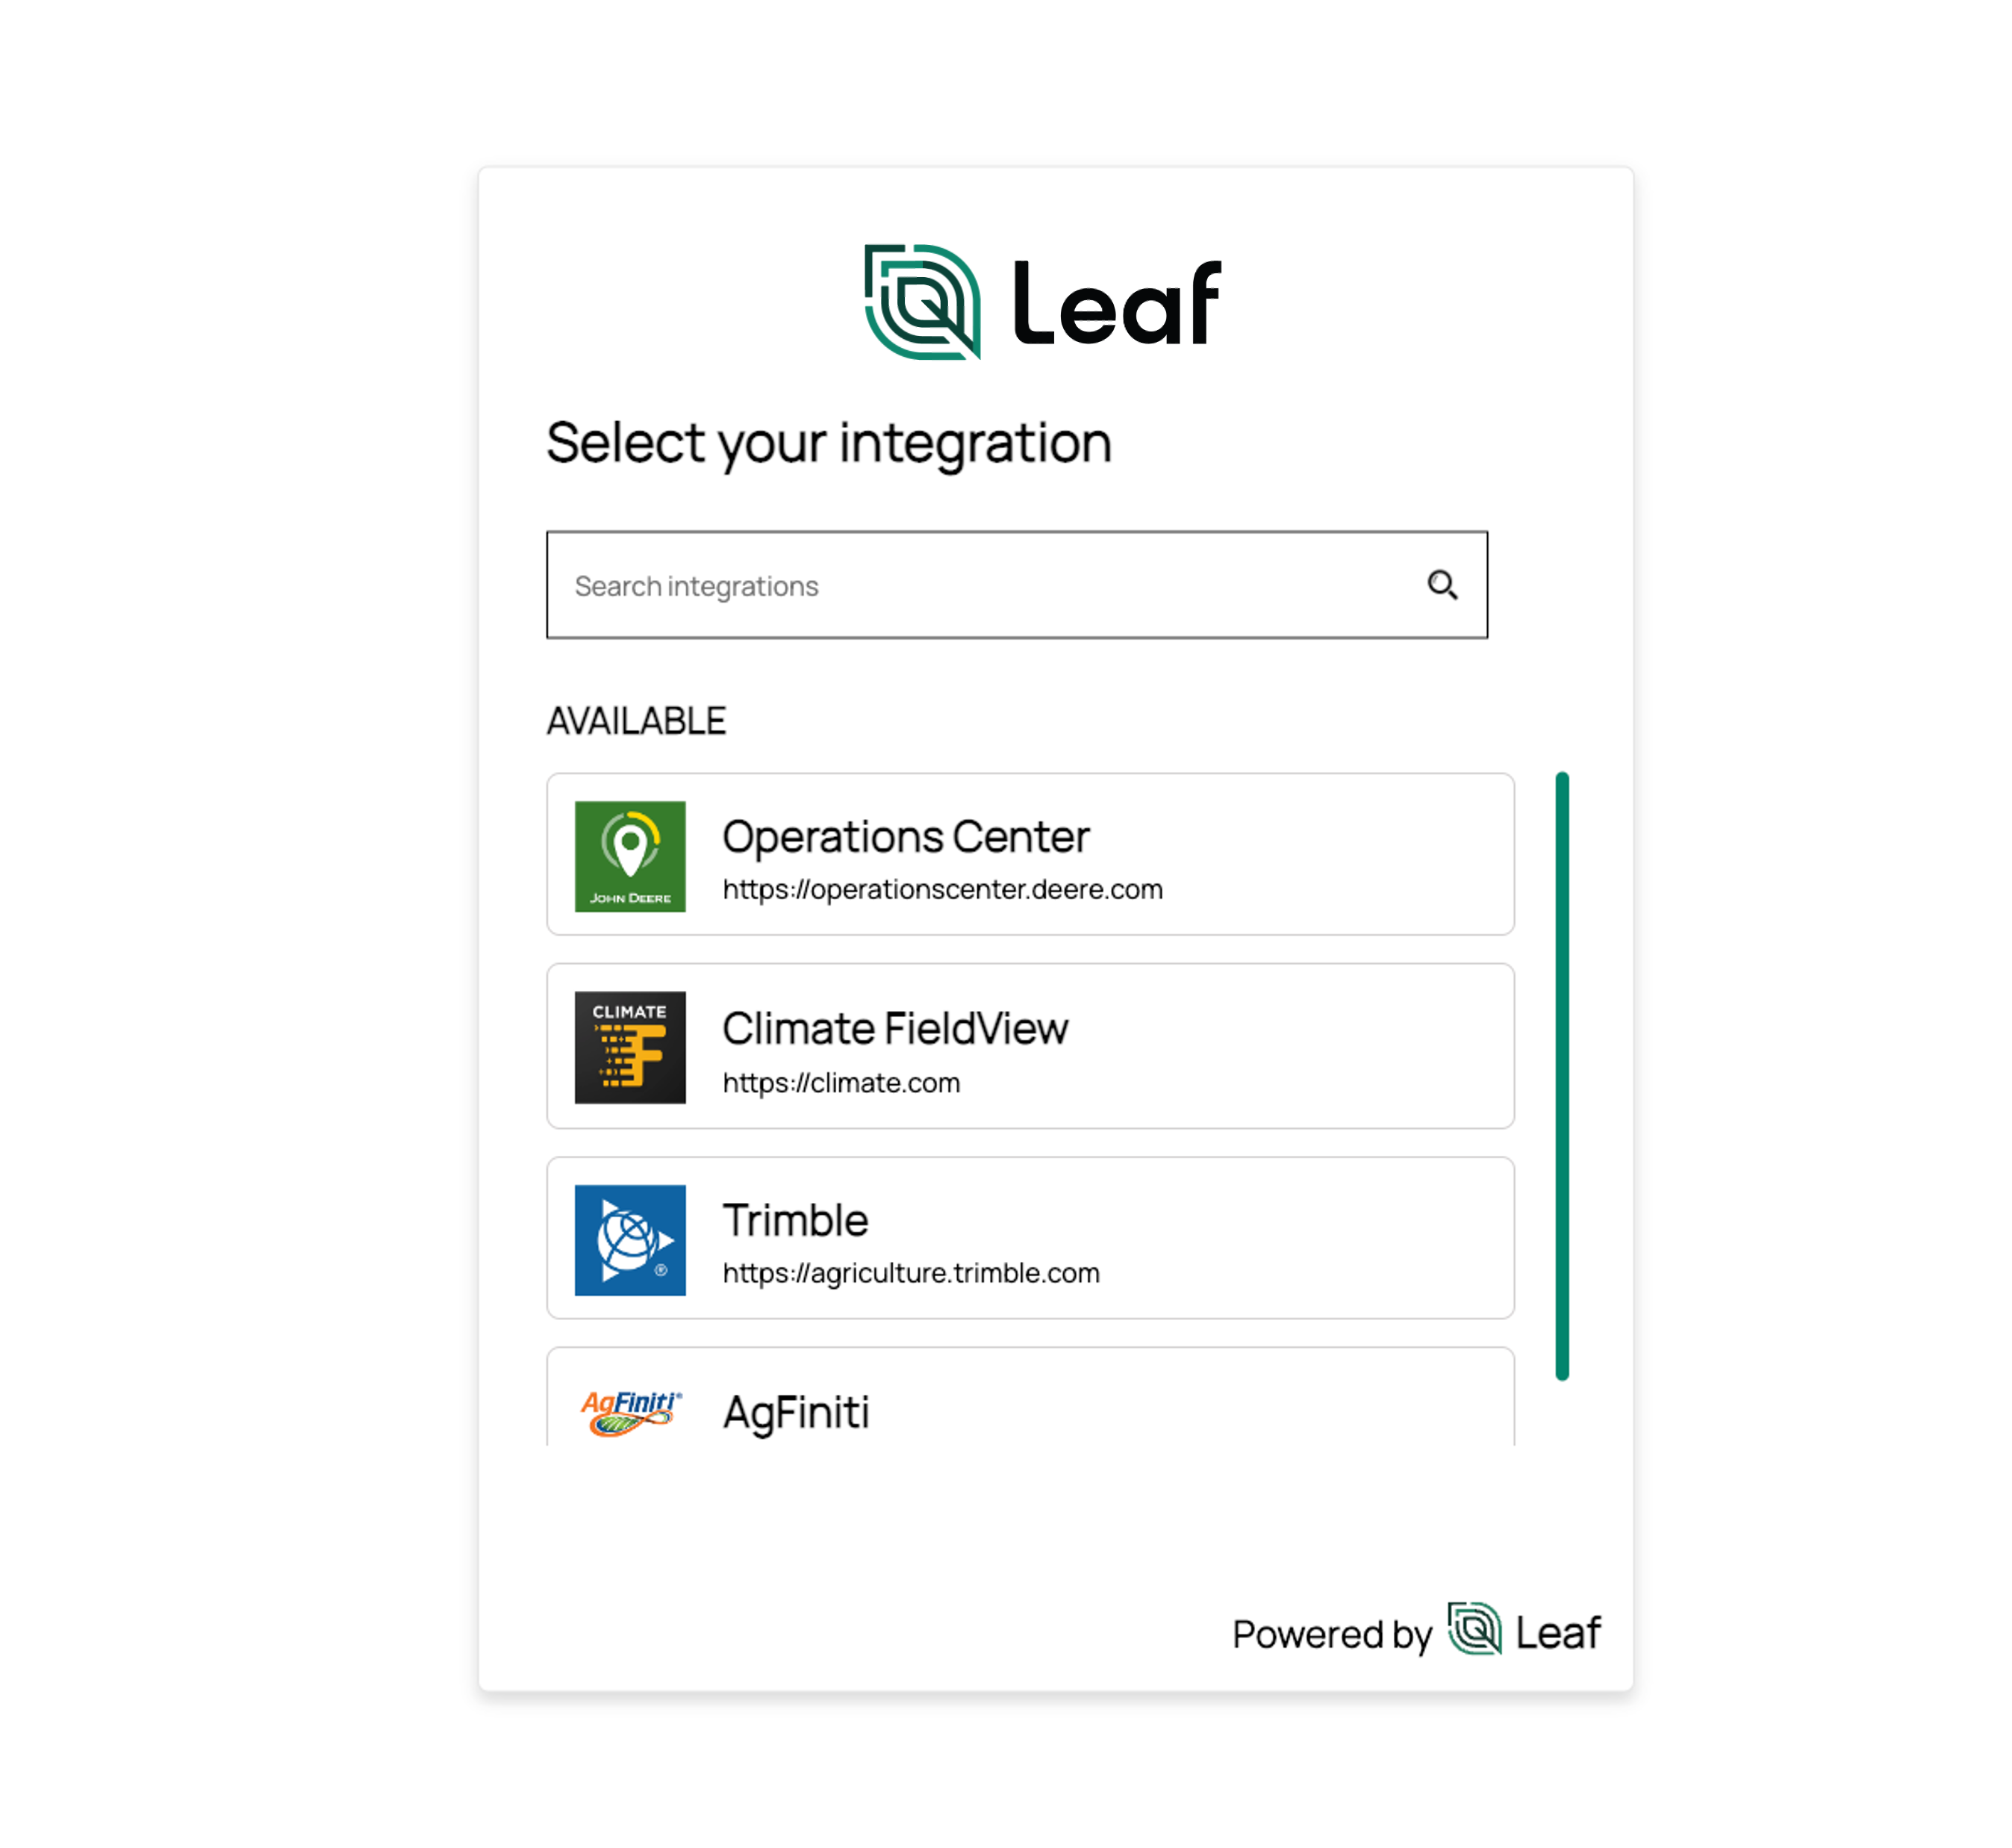
Leaf's Provider Connection / Authentication Link is a widget that you can install with minimal setup and a few lines of code. This widget enables your customers to connect their existing provider accounts, which associates it with their Leaf User.
Beta
This is a beta feature.
Get started
1. Sign in with a Leaf account
You will need a Leaf account. If you don't have one yet, you can create it here.
2. Get to know the Leaf user entity
All control of connected providers is done at the Leaf user level (usually it represents the user of your application), so it's important to know more about it here.
3. Create the user application tokens
Since the connection is at Leaf user level, the widget uses a different authentication method. We will required to create an API key for each Leaf user. This will ensure that the Leaf user only accesses its own resources.
The endpoints to manage those application tokens are here.
Set up
To use the widget you will need to enable the providers. Don't worry, you only need to set it up once.
John Deere
To enable John Deere as a provider in the widget you need your application already registed with John Deere. You can find more info on how to create a developer account here.
Redirect URI
The first step is to add our widget URL in the "Redirect URI" section:
In the My applications page, select your application and edit it to add the URL here

Application info
To allow the users to authenticate with John Deere, you will need to send your application info to this endpoint
POST /usermanagement/api/app-keys/JohnDeere/{appName}/{clientEnvironment}
For John Deere, it is necessary to inform the:
clientKey(Application Id)clientSecret(Secret)
You can set the appName and the clientEnvironmentas the environment your application is enabled on John Deere: STAGE or PRODUCTION.
Here is a request example:
- cURL
- Python
- JavaScript
Climate FieldView
To enable Climate FieldView as a provider in the widget you need your application credentials from Climate. You can find more info on how to create a developer account here.
Application info
To allow the users to authenticate with Climate FieldView, you will need to send your application info to this endpoint
POST /usermanagement/api/app-keys/ClimateFieldView/{appName}
For Climate FieldView, it is necessary to inform the:
apiKeyclientIdclientSecret
You can set the appName.
Here is a request example:
- cURL
- Python
- JavaScript
CNHi
To enable CNHi as a provider in the widget you need your application credentials from CNHi. You can find more info on how to create a developer account here.
OAuth Callback URL
The first step is to add our widget URL in the "App OAuth Callback URL(s)" section:
In the Developer Dashboard page, select your application and edit it to add the URL here

Application info
To allow the users to authenticate with CNHi, you will need to send your application info to this endpoint
POST /usermanagement/api/app-keys/CNHI/{appName}/{clientEnvironment}
For CNHi, it is necessary to inform the:
clientId(Client Id)clientSecret(Client Secret)subscriptionKey(Primary SubscriptionKey)
You can set the appName and the clientEnvironment as the environment your application is enabled on CNHi: STAGE or PRODUCTION.
Here is a request example:
- cURL
- Python
- JavaScript
AgLeader
To enable AgLeader as a provider in the widget you need your application credentials from AgLeader. You can find more info on how to create a developer account here.
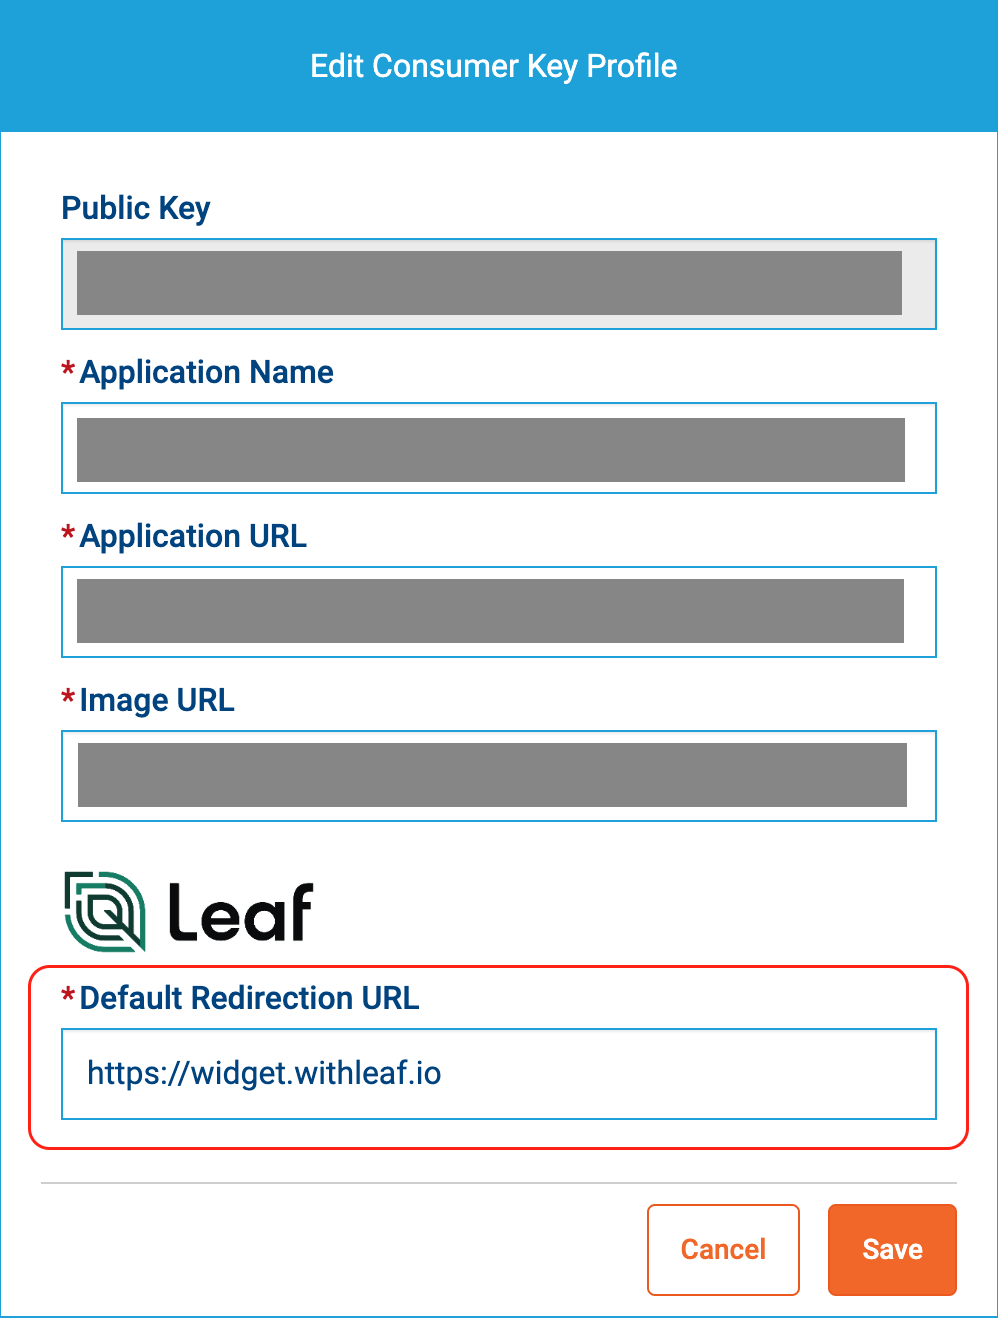
Redirection URL
The first step is to add our widget URL in the "Redirection URL" property:
In the Consumer Keys page, select your application and click in the "Edit Consumer Key Profile" option to edit it add the URL here
Application info
To allow the users to authenticate with AgLeader, you will need to send your application info to this endpoint
POST /usermanagement/api/app-keys/AgLeader/{appName}
For AgLeader, it is necessary to inform the:
privateKeypublicKey
You can set the appName.
Here is a request example:
- cURL
- Python
- JavaScript
Trimble
To enable Trimble as a provider in the widget you need your application credentials from Trimble. You can find more info on how to create a developer account here.
Authentication Callback URL
The first step is make sure our widget URL is registered in the "Authentication Callback URLs" section. It may be necessary to contact Trimble to request the change.
Application info
To allow the users to authenticate with Trimble, you will need to send your application info to this endpoint
POST /usermanagement/api/app-keys/Trimble/{appName}
For Trimble, it is necessary to inform the:
applicationNameclientIdclientSecret
You can set the appName.
Here is a request example:
- cURL
- Python
- JavaScript
Raven Slingshot
To enable Raven Slingshot as a provider in the widget you need your apiKey and sharedSecret from Raven. You can find more info on creating a developer account here.
Application info
To allow the users to authenticate with Raven Slingshot, you will need to send your application info to this endpoint
POST /usermanagement/api/app-keys/RavenSlingshot/{appName}
For Slingshot, it is necessary to inform the:
apiKeysharedSecret
You can set the appName.
Here is a request example:
- cURL
- Python
- JavaScript
tip
Remember your user will still need to provide the Access Key during the authentication process.
Stara
To enable Stara as a provider in the widget you need your developer user and pwd from Stara. You can find more info on creating a developer account here.
info
Stara is not yet available in Link Angular
Application info
To allow the users to authenticate with Stara, you will need to send your application info to this endpoint
POST /usermanagement/api/app-keys/Stara/{appName}
For Stara, it is necessary to inform the:
userpwd
You can set the appName.
Here is a request example:
- cURL
- Python
- JavaScript
Tutorial
Angular
tip
Here you can run a live use case demo! It will only be necessary to replace your information in the .html component.
To add this Leaf widget in an Angular application, you can use the @withleaf/leaf-link-angular library, which is a JavaScript library that provides all Leaf UI Widgets.
Here are the general steps to get started:
- Install the @withleaf/leaf-link-angular package using
npm:
- Import the library in your component or module file:
- Add the component to the HTML. Make sure you already created the Leaf user API key (
apiKey); you need to specify both the Leaf User API Key and the Leaf User ID (leafUser) in the required properties in the HTML component. Check all the properties available on the reference here.
React
tip
Here you can run a live use case demo! It will only be necessary to replace your information in the App.tsx file.
To add this Leaf widget in a React application, you can use the @withleaf/leaf-link-react library, which is a JavaScript library that provides all Leaf UI Widgets.
Here are the general steps to get started:
- Install the @withleaf/leaf-link-react package using
npm:
- Import the component in your
*.tsxfile:
- Add the component to the
*.tsxfile. Make sure you already created the Leaf user API key (apiKey); you need to specify both the Leaf User API Key and the Leaf User ID (leafUser) in the required properties in the tsx component. Check all the properties available on the reference here.
Reference
Property Overview
| Name | Type | Summary |
|---|---|---|
| apiKey | String | The authentication API Key |
| companyLogoUrl | String | Customization: a link to the company logo |
| companyName | String | Customization: the name of the company |
| isDarkMode | Boolean | Enable/disable the dark mode |
| leafUser | String | The Leaf User ID |
| locale | String | Forces the widget language |
| title | String | The title of the widget |
| showSearchbar | String | Show/hide the search bar |
| title | String | The title of the widget |
Property Details
apiKey
The apiKey is the authentication key that will allow the use of the widget.
It can be created and managed here.
companyLogoUrl
The URL to the company logo. It will be displayed in the landing screen. It can be a PNG, JPEG or SVG.
companyName
The company name. It will be displayed in the landing screen and in each reference about the customer.
isDarkMode
Toggles dark mode on and off. The default value is false.
leafUser
The Leaf User ID. Check this page for more info about the Leaf User.
locale
By default, the widget sets the language based on the user's browser configuration, but to force a language, use this property with one of the possible values: en_US, pt_BR, es_ES, or fr_FR.
showSearchbar
Shows/hides the search bar for providers available for integration. The default is true, so the search bar will be displayed.
title
The title displayed in the widget. The default is "Select your integration".
Customized texts will not be automatically translated.
Hooks Overview
Leaf Link also have hooks that can improve the developer experience when using the widgets.
| Name | Type | Description |
|---|---|---|
| providersConnected | Array<{ provider: string; createdTime: string }> | Provide the array of the provider connected and also the createdTime - available after finish the connection process |
| providerWidgetStatus | { code: number; message: string } | Provide the status code and the message from the current widget Status |
Hooks Details
providersConnected
Provides the array of the providers connected with the createdTime. It will be available after finish the connection process.
providerWidgetStatus
Provides the status code and the message from the current widget status:
Status Codes
| Code | Message |
|---|---|
| -1 | Error |
| 0 | Started |
| 1 | Done |
How to use it
Angular
Use the getWidgetStatus property to reference a function in your component.
From the component, you can get the status and the providers connected in the referenced function.
React
{ Leaf } import is the context that handle with the providers data.
Considering you have a custom component that need to handle or just receive the data updates from Provider Widget:
Then, wrap your component in the hook as a children
From your top-level component can pass the current data to all components below, no matter how deep.
This variables will be updated every time the Provider update the steps i.e move from one step to other.
Tips
The way that the developer get the updated value from the hook can be different depending the of the application, personal preferences or the way it is architected. We suggest the following with useMemo but it can be also implemented with useEffect.
useMemo runs the function and caches its result, which will only be recomputed if any value in the dependency array changes. It helps optimize performance by avoiding unnecessary recalculations.
Example